 |
|
| Introduction |
|
|
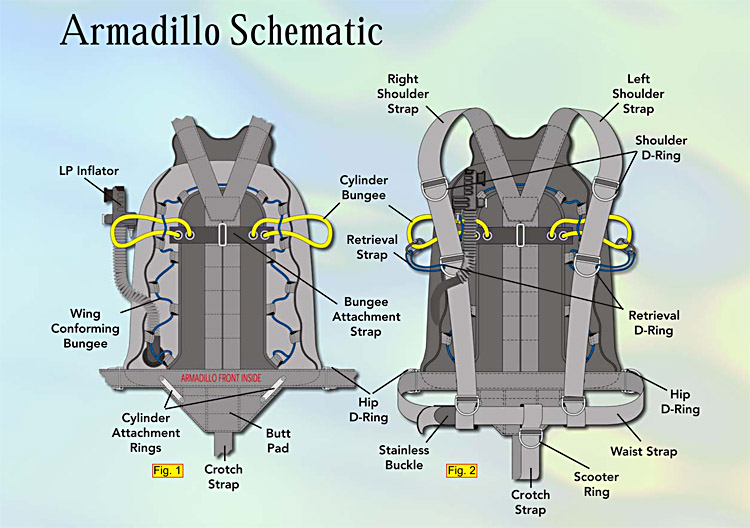
Designed mainly for side mount cave exploration, the Armadillo has evolved into a system that can be used for all types of diving. |
|
|
|
•
|
Open water divers can use the harness with a single cylinder mounted on their back |
|
•
|
Rebreather divers can incorporate their CCR / SCR units as a back mount scrubber and side mount oxygen and diluent drive cylinders |
|
•
|
Exploration divers can back mount their bottom gas and side mount their decompression gases |
|
•
|
Extreme cave explorers can use the system as it was perfected for, tight, remote, hard-toreach caves anywhere on the planet |
|
|
|
|
| Introduction |
|
 |
|
 |
|
The Armadillo system did not evolve over night; hundreds of dives over several years were conducted in multiple locations and environments. From shallow reef diving in the Florida Keys, to extreme deep cave exploration in Tennessee, high flow blue holes in the Bahamas, cold wreck diving in the Great Lakes, archeological discoveries in Mexico’s Yucatan, and swimming with hundreds of Hammerhead sharks in Coco’s Island, the Armadillo side mount harness has been tested thoroughly. From these experiences, the Armadillo system has been perfected to provide the serious diver with a rugged tool to go where no diver has ever gone before. |
|
|
 |
|
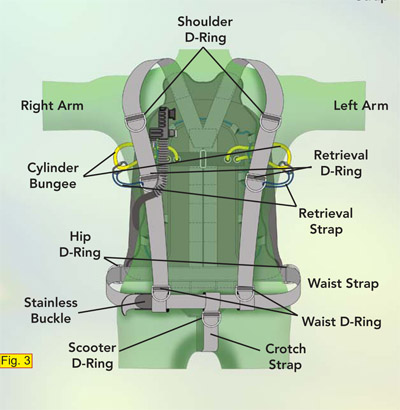
| Even though the Armadillo harness is designed for simplicity, it is extremely important that it fits the diver correctly. An improper fit takes away the streamlined performance and needed buoyancy control. The Armadillo’s buoyancy control device (wings), shoulder, waist, crotch straps, butt pad, and cylinder attachments are designed into a single harness. The wings have a maximum lift of 34 pounds. The Armadillo harness is designed to fit most standard sized adults. It is not designed to fit extremely small or extra large people. Sizes from 5 feet (152 cm) tall, 115 pounds (52 kg) to 6 feet, 5 inches (196 cm) tall, 250 pounds (113 kg) should have little problem sizing the harness to fit them.
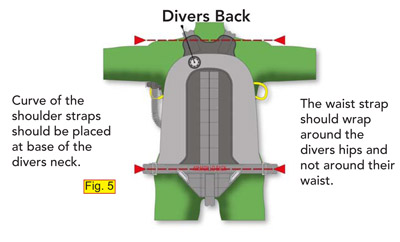
Positioning the harness on your body (Fig. 5)
The harness must be positioned on your body correctly so that the shoulder and waist straps fall in the proper positions. This is essential for a proper fit.
To position the harness on your body:
1. Place the harness on your back with the bungee side in.
2. Align the curve of the shoulder harness to the base of your neck (see the diagram below).
|
|
3. Hold the shoulder straps tightly over your shoulders.
4. Move your head and neck around to make sure the harness is not cutting into the base of your neck.
If it is rubbing your neck, lower the shoulder harness one inch (2.5 cm) or until it feels comfortable. The waist strap is designed to wrap around the divers upper hips and not around the waist as a normal open water BCD fits. The wings are designed to have the most lift at the divers hips and not at their shoulders. This is important because most of the weight from the cylinders is attached to the divers butt pad, causing their waist to be the heaviest. Less lift in the divers shoulders also allows for proper horizontal, head down – fins up swimming position.
|
|
 |
|
|
|
 |
|
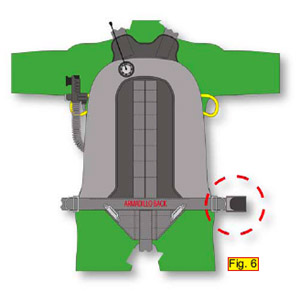
Positioning the waist buckle (Fig. 6)
The waist buckle should be placed on either the divers right or left hip (divers preference) as close as possible (1 to 3 inches) (2.5 to 7.6 cm) to the wing and hip D-ring.
Note: The shoulder straps are rigged to slide over the waist buckle, which prevents the buckle from accidentally opening.
To position the waist buckle:
1. While holding the harness in place over your shoulders (have someone assist you), wrap the waist straps around your hips.
2. Estimate the best position for the buckle on either the right or left hip.
3. Mark the position with a marker.
4. Remove the harness and weave the buckle into place (see the diagram below).
|
|
|
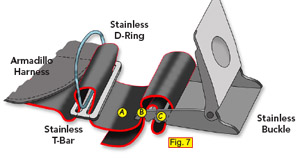
Attaching the waist buckle (Fig. 7)
You must weave a T-bar and D-ring onto the waist strap and the stainless buckle onto the waist strap. The buckle should be placed just above the left or right hip.
To attach the waist buckle: (Fig. 7)
1. Weave the waist strap up through slot A and then down through slot C.
2. Weave the waist strap up through slot B and then back down through slot A.
3. Tighten the strap onto the buckle.
4. Cut the strap 8 inches (20 cm) from the buckle to allow for size adjustments if needed in the future.
|
|
 |
|
|
 |
|
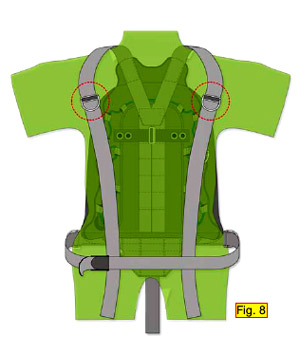
Positioning the shoulder D-rings (Fig. 8)
D-rings should be placed at a comfortable location on the shoulder straps. The D-rings are used to attach the low-pressure inflator hose and the second stage regulators.
To position the shoulder D-rings:
1. Properly reposition the harness on your back.
2. Tighten the waist strap around your hips and lock it into position with the waist buckle.
IMPORTANT: The Armadillo system was not designed to wear without an exposure suit. Keep the adjustments lose enough for your type of exposure suit (wet suit or dry suit). If you are planning on using multiple types of exposure suits, fit the harness tightly to your bulkiest exposure suit. This allows for the harness to also be used on thinner exposure suits.
3. Weave a stainless T-bar and D-ring onto the right and left shoulder straps.
4. Position the T-bar and D-rings 1 to 3 inches (2.5 to 7.6 cm) below the collarbone.
5. Make sure the left and right shoulder D-rings are even.
|
|
|
|
|
|
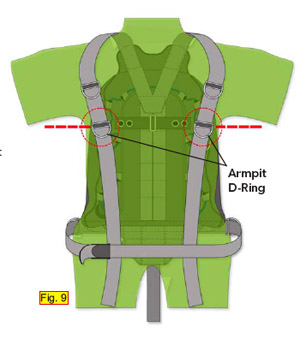
Positioning the armpit D-rings (Fig. 9)
D-rings should be placed just below your armpits. These D-rings are used for the bungee retrieval straps and attachment D-ring for stage cylinders, reels, cameras, etc.
To position the armpit D-rings:
1. Properly reposition the harness on your back.
2. Tighten the waist strap around your hips and lock it into position with the waist buckle.
3. Weave a stainless T-bar and D-ring onto the right and left shoulder straps.
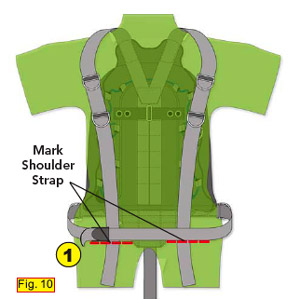
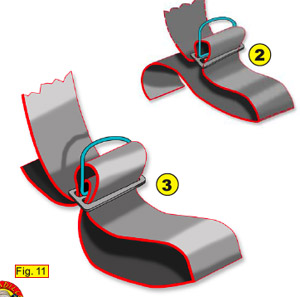
4. Position the T-bar and D-rings just below your armpits. Making the shoulder strap and crotch waist loops with D-rings (Fig. 10 & 11) Simple loops in the right and left shoulder straps slide over the waist strap providing a five-point harness. D-rings are placed onto these loops to provide extra attachment points for reels, cameras, slates, etc.
To make the loops with D-rings:
1. Properly reposition the harness onto your back.
2. Tighten the waist strap around your hips and lock it into position with the waist buckle.
3. Slide the shoulder straps under the waist strap and tighten to a comfortable fit. (1)
4. Mark the shoulder straps just below the waist strap (Fig. 10)
5. Remove the harness and weave a T-bar and D-ring 4-inches (10 cm) above the mark. Keep the strap loose. (2)
6. Bend the shoulder strap under and flatten it at the mark using a hammer.
7. Weave the strap back through the T-bar and Dring. (3)
8. Make the size of the loop large enough so it slides over the waist strap and waist buckle. The loop is used to prevent the waist and light buckles from accidentally opening.
|
|
 |
|
|
|
 |
|
Assembling the shoulder, crotch, and waist straps (Fig. 12)
The two shoulders and crotch strap loops slide over the waist strap to form a five-point harness.
To assemble the shoulder, crotch, and waist straps:
1. Put on the harness, and slide the left shoulder strap loop over the waist strap.
2. Bend over and retrieve the crotch strap loop. Slide it over the waist strap.
3. Slide the right shoulder strap loop onto the waist strap.
4. Push all three straps as far to the left as possible.
5. Insert the waist strap through the waist buckle and pull it tight.
6. Close the waist buckle and slide the remaining waist strap through the waist D-ring.
7. Slide the right shoulder strap loop over the waist buckle. This locks it in place.
8. Move the crotch strap into a comfortable position.
9. If you are using a waist mounted light on the left that is kept in place by a buckle, slide the left shoulder strap over that buckle.
Note: If you decided to rig the harness with the buckle on your left hip, reverse this whole process.
|
|
|
 |
|
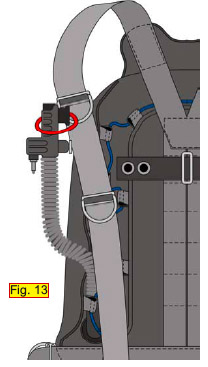
Attaching the low-pressure inflator to the harness (Fig. 13)
Note that the low-pressure inflator is attached at the BCD’s lower inside right port. This protects the elbow and corrugated hose from abrasion and snags. The low-pressure hose is designed for positioning on your right side and secured to the right shoulder D-ring.
To attach the low-pressure inflator hose:
1. Attach the low-pressure inflator to the shoulder D-ring using a small piece of bungee tied into a ring (see the diagram on this page).
2. Tighten the bungee enough to hold the inflator in place, but keep it loose enough so that you can remove the inflator if necessary.
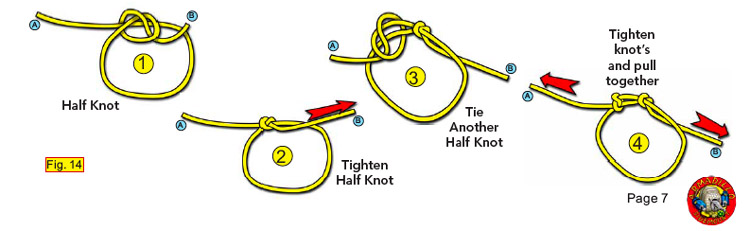
Tying a bungee into a ring (Fig. 14)
A ring bungee is no more than a strong bungee cord tied into a circle. Ring bungee is used to hold gear in place on the harness, such as second stage regulators, and is used in several different locations. They are strong, simple to make, and easy to remove and replace in the field.
|
|
 |
|
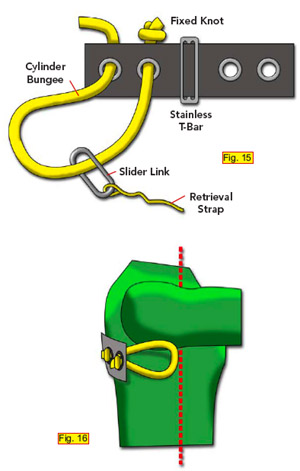
Adjusting the cylinder bungee (Fig. 15)
The key to any side mount system is its ability to pull the cylinder valves and first stage regulators tightly into your sides.
The Armadillo comes with two large bungees that are attached to the inside back of the harness. The bungees are extra long and need sized for your chest girth.
A 13-inch (33 cm) piece of webbing with four stainless grommets is attached to the inside back of the harness. The bungee cord is threaded through the grommet and a knot is tied into the bungee securing it onto the harness.
To adjust the cylinder bungee:
1. Pull the bungee through the grommet to the desired length (see the diagram on this page).
2. Tie a tight knot in the cord.
Note: Each person’s required bungee length is different depending on his or her chest size. A good rule of thumb is to start with the bungee length just forward of your armpit. If the cylinder valve and first stage regulator still protrude to far forward, shorten the bungee. (Fig. 16)
|
|
 |
|
|
 |
|
Bungee retrieval strap (Fig. 17)
The bungee cord is also run through a small metal slider link. The slider link is used for the bungee retrieval system.
The bungee retrieval strap provides a quick method of retrieving the cylinder bungee. It also prevents the bungee from becoming lost when it falls between your body and the harness.
The small bungee strap is attached to the slider link and to the armpit D-ring. This strap should be shortened as much as possible once the unit has been sized to prevent snag points.
|
|
|
 |
|
Wing conforming bungee (Fig. 18)
The buoyancy inflation system is what separates the Armadillo apart from other side mount systems. The Armadillo is specifically designed to provide more lift on the divers hips, which displaces the weight of the cylinders. This results in less weight on the shoulders and ensures a proper horizontal swimming profile.
The wing conforming bungee is designed to increase or decrease the amount of lift depending on what type of exposure suit and buoyancy demands are needed. A looser bungee system allows for more lift when wearing a wetsuit and a tighter bungee system pulls the wings in for a more streamlined system and less lift when wearing a dry suit.
The conforming bungee also helps to prevent a common side mount problem called “angel wings.” Angel wings are when the BCD rides up high on the divers back making the appearance of wings. This greatly decreases the streamline effects of the harness and adds unnecessary drag, wear and tear, and creates additional snag problems. The Armadillo’s conforming bungee prevents an excessive angel wing effect by pulling the BCD tighter towards the diver’s body.
To tighten the conforming bungee:
1. Cut the bungee cord at the tie off location on the BCD.
2. Tighten the bungee cord by pulling it through the BCD.
3. Retie the bungee cord.
|
|
|
 |
|
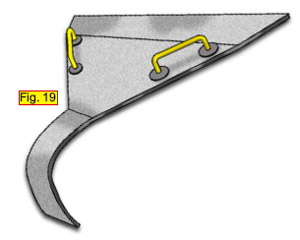
Butt pad and attachment handles (Fig. 19)
The Armadillo harness incorporates a single butt pad sewn from heavy-duty nylon webbing. Two metal handles are bolted to the butt pad to provide a sturdy attachment location for the cylinder clips. The crotch strap is sewn directly into the butt pad and provides the fifth strap in the five-point harness system.
The metal attachment handles are designed to handle the weight of cylinders while in the water. Cylinder neck clips should be added if the cylinders are transported attached to the harness out of the water. The clips assist with the weight of the cylinders while out of the water.
|
|
|
 |
|
 |
|
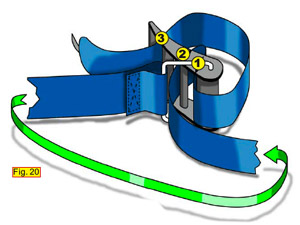
Feeding the cam strap (Fig. 20)
Cam straps are used for the attachment points on the side mount cylinders. The diagram on the left illustrates the proper method for feeding the strap through the cam strap buckle. Arrows are molded into the cam buckle showing the direction to feed the strap.
|
|
|
 |
|
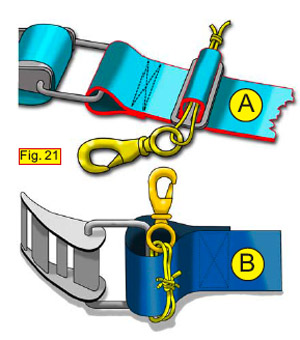
Tank attachment straps (Fig. 21)
Each cylinder requires one cam strap with either a #1 or #2 brass clip. The clips are used to attach the cylinder to the metal attachment handles located on the back of the harness.
• #1 Brass clips should be used by divers with normal to large hips
• #2 Brass clips can be used by those with smaller hips to raise the cylinders higher
There are two methods to attach the brass clip to the cam strap.
A. A T-bar is used to capture a heavy line looped through the brass clip with a knot tied in the opposite end. When tightened, the knot cannot pass through the T-bar.
B. Strong bungee is fed through the small hole on the cam strap buckle and the eye of the brass clip. The cord is pulled tight and a knot is tied into the bungee securing the clip close to the cam strap.
Note: In both methods, the brass clip should be as close as possible to the cam strap.
|
|
|
 |
|
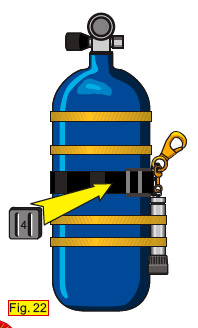
Setting up the cylinders (Fig. 22)
Proper set-up of the side mount cylinders is essential to maintain proper buoyancy and streamlining.
The cam strap is slipped over the cylinder and tightened by pulling the strap tight and closing the cam buckle. The distance from the top of the cylinder valve the cam strap is placed varies depending on your chest length. A good rule of thumb is to measure from your armpit to your belt line. Place the cam strap the same distance from the top of the valve.
Some types of cylinders, such as aluminum tanks, become buoyant as they are emptied. For these cylinders, you may need to attach hard weights to the cylinder cam straps in order to compensate for the buoyancy change. Hard weights can also be added to the cylinder cam straps to offset the buoyancy of wetsuits and dry suits. If additional weight is needed due to dry suit buoyancy, a standard weight belt can be used under the Armadillo harness.
Back-up lights can also be attached to the cam straps brass clip eye and held in place using rubber bands (Fig. 22).
|
|
|
 |
|
Right and left post cylinders (Fig. 23)
The cylinder bungee on the Armadillo is used to pull the valve of the right and left cylinders into your armpits.
A right (standard) and left post valve is recommended for side mount cylinders. (These are the same valves as on a set of doubles without the cross over bar.)
|
|
|
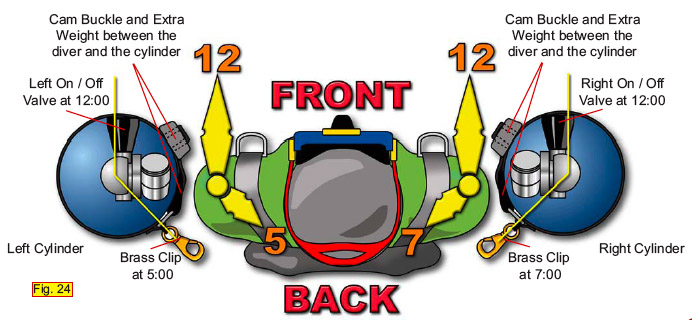
Positioning the right and left cylinders in conjunction with the divers profile (Fig. 24)
The drawing below illustrates the proper angle of the cylinder on/off knob and the brass clip in conjunction with your front and back. The drawing also illustrates the proper positioning of the cam buckle and added weight.
Note: The cam strap buckle and weight should be positioned between the diver and the cylinder to help reduce the chance of a line snag.
The first stage regulators should be tilted slightly towards your front. All hoses, if possible, should be routed down towards your front. Make sure the HP gauge is located so that it can be read during the dive.
|
|
 |
|
|
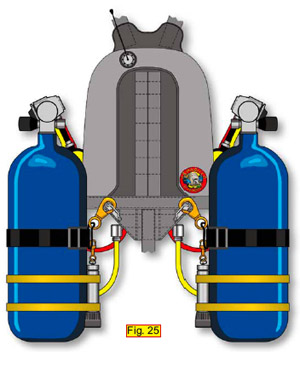
Attaching cylinders to the butt plate (Fig. 25)
The two, 3/8-inch handles on the Armadillo butt plate are the main attachment points for the side mount cylinders.
To attach the cylinders to the butt plate:
1. Clip the right cylinder to the right attachment handle on the butt plate.
2. Clip the left cylinder to the left attachment handle on the butt plate.
Note: These attachments are not designed to carry the weight of the cylinders out of the water. Cylinders should be attached after you enter the water.
|
|
 |
|
|
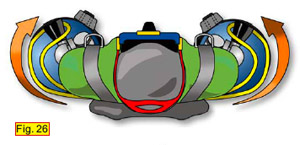
Attaching the cylinder bungee to the cylinder valve (Fig. 26)
After the side mount cylinder is attached to the butt plate handle, the cylinder bungee must be attached to the cylinder valve.
To attach the cylinder bungee to the cylinder valve:
1. Reach under your arm and grab the large cylinder bungee cord with your thumb.
2. Stretch the bungee around the backside of the cylinder valve and over the on/off handle.
3. Release the bungee. This should pull the neck and first stage regulator tight into your armpit.
|
|
 |
|
|
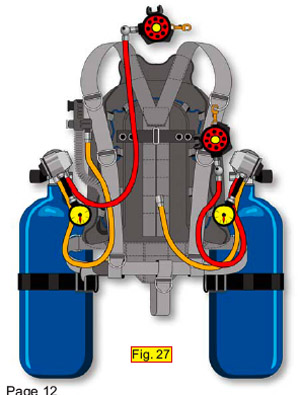
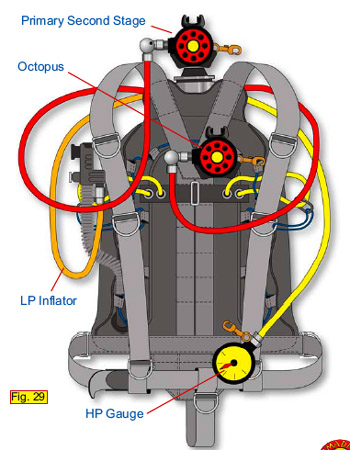
Hose configuration and placement (Fig. 27)
The diagram to the left illustrates the proper hose placement for side mount cylinders. A long hose can be used on the left cylinder if desired and wrapped up around the back of the divers neck.
Ninety-degree elbow adapters can be used on the second stage regulators to prevent jaw fatigue from sharp hose angles. Custom length hoses for the LP inflators and regulators can be designed to further streamline and simplify the system. Lose hoses should be tucked under the waist belt to further streamline the rig.
The second stage regulator that is not in use should be clipped to the upper left D-ring. When changing second stages underwater, unclip the regulator not in use, exchange, and then clip the exchanged regulator back onto the left upper D-ring.
|
|
 |
|
|
 |
|
Attaching a single cylinder (Fig. 28)
The Armadillo harness can also be used with a single cylinder for recreational diving.
To set up the harness for a single cylinder:
1. Slip two cam straps through the slots located on the back of the harness.
2. Feed the straps through their buckles and slide over the cylinder.
3. Tighten the cam strap and close the cam buckle. See the diagram below for a suggested regulator configuration.
|
|
|
Attaching a bailout cylinder
When using a single cylinder, it is recommended that you carry a redundant bailout system. A small 13 to 47 cubic foot cylinder can be side mounted under one of the divers arms with it’s own first and second stage regulator and pressure gauge.
Attaching triple cylinders
Triple cylinders can also be used by mounting a single cylinder on your back and side mounting two cylinders under your arms.
WARNING: The Armadillo only has 32 pounds of buoyancy. Make sure you can obtain positive buoyancy with all cylinders and equipment. To obtain additional buoyancy, wear either a thicker wetsuit or a dry suit.
|
|
 |
|
|
 |
|
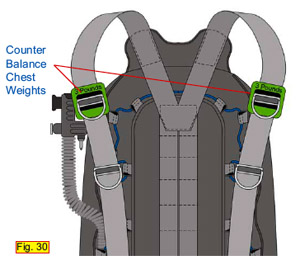
Adjusting buoyancy and trim using permanent chest weights (Fig. 30)
The most important factor with side mount configuration is maintaining the proper head down, fins up swimming position. The Armadillo harness was designed with most of its lift capacity towards the divers hips and off of the shoulders. Large steel cylinders and heavy fins can pull the divers hips down and out of the preferred swimming profile. To counterbalance this, you can add two small, 2 to 3 pound trim weights to the harness shoulders.
|
|
|
 |
|
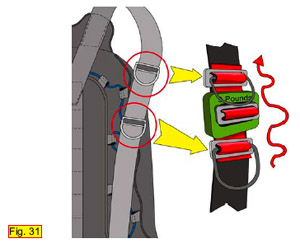
Traveling with chest weights (Fig. 31)
Permanent chest weights can cause problems with luggage weight restrictions during air travel. Most of the time, single hard weights can be obtained at foreign resorts or dive facilities for both the aluminum 80 cylinders and chest weights.
A simple method of attaching a hard weight to the shoulder straps can be seen in Fig. 31.
An extra piece of 2-inch webbing and a T-bar can be threaded through a hard weight and then through the upper and lower shoulder T-bars and D-rings.
|
|
|
| Warning: |
Technical diving, including diving beyond recreational depth limits, over head environments and use of compressed breathing gas mixtures is extremely dangerous and can cause serious injury and death even by those with proper training and years of experience.
DO NOT USE this harness if you have not obtained proper sidemount cave training and certification.
|
|
 |
|
|
| Copyright 2009 © Advanced Diver Magazine |